Glow Showdown: Choosing the Best Exfoliating Tool for Your Home Facial
With so many scrubs, acids, brushes, and gadgets on the market, picking the right exfoliating tool can feel overwhelming. This guide DEMYSTIFIES options for at-home facials, explains why tool choice affects results and skin health, and helps you match tools to goals like smoothing texture, unclogging pores, or boosting radiance.
We’ll compare manual scrubs, chemical exfoliants (AHAs, BHAs, enzymes), and devices such as brushes and microdermabrasion tools. Criteria include skin type suitability, strength, safety, cost, and ease of use. Expert tips plus step-by-step aftercare are included to ensure safe, effective results always.
Best Value
Amazon.com
COSLUS 2-in-1 Silicone Electric Facial Cleansing Brush
Top 5 Brightening Face Scrubs & Exfoliants for Clear, Glowing Skin + How to Exfoliate
1
Why Exfoliation Matters: Goals, Benefits, and Risks
What exfoliation actually does
Exfoliation removes the top layer of dead skin cells to reveal smoother texture, unclog pores, and improve radiance. That cleared surface also lets serums and moisturizers penetrate more effectively—think of it as removing a dust layer so the paint (or product) can adhere evenly.
Mechanical vs chemical action (high-level)
Mechanical: physical friction (scrubs, cloths, microdermabrasion) that sloughs cells away.
Chemical: acids or enzymes that break the glue between corneocytes or digest proteins, letting cells shed without rubbing.
A simple analogy: mechanical is like sanding rough wood; chemical is like a solvent that softens and lifts the finish.
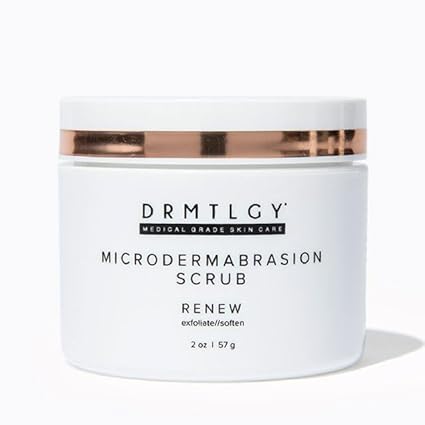
A non-abrasive microdermabrasion scrub using fine pumice granules to buff away dead skin and improve texture, tone, and the appearance of pores. Formulated with natural extracts and made in the USA for gentle, effective exfoliation.
Always follow with moisturizer and SPF during the day.
Next up: we’ll examine hands-on physical tools—what they feel like, who they suit, and how to pick the right scrub or cloth for your skin.
2
Manual Physical Tools: Scrubs, Cloths, and Handheld Scrapers
Hands-on tools give immediate tactile feedback—perfect for a weekend home facial. Below are the common options, how they work, who they suit, and practical safety notes.
Exfoliating scrubs (particle and enzyme-based)
Particle scrubs use little beads or grains to rub off dead cells; enzyme scrubs (papaya, pineapple) digest proteins more gently.
Works best for: normal to oily, non-inflamed skin.
Pros: instant polish, affordable, easy to rinse off.
Cons: large, jagged particles (e.g., walnut shell) can cause microtears and long-term roughness; avoid on acne, rosacea, or sensitive skin.
Quick tip: choose rounded particles (sugar, jojoba, silica) and enzyme formulas when in doubt.
Washcloths, mitts, and konjac sponges
A soft washcloth or terry cloth mitt gives manual abrasion you control; konjac sponges offer very gentle physical exfoliation plus cleansing.
Works best for: most skin types—cloths for tougher skin, konjac for sensitive or dry.
Cons: uneven pressure with mitts, bacteria risk if not cleaned/dried.
Try a konjac sponge for morning refreshes; launder mitts weekly and replace sponges every 4–6 weeks.
Manual dermaplaning tools (facial razors/blades)
Light scraping removes vellus hair and the top layer of dead cells for a silky canvas.
Works best for: dry to normal skin without active acne.
Pros: immediate smoothness and better product absorption.
Cons: small risk of nicks, irritation, and overuse can thin fragile skin.
Must-Have
Schick Hydro Silk Touch-Up Dermaplaning Face Razors
Travel-friendly dermaplaning and eyebrow shaping
A slim dermaplaning tool and eyebrow razor that removes peach fuzz, shapes brows, and gently exfoliates for smoother skin. Each disposable razor has micro-guards for skin protection, includes a precision cover, and is recyclable.
Use a single-blade, clean razor at a 45° angle with short strokes.
Particle choice & technique tips
Particle size/shape: rounded fine sugar/silica ≫ jagged shells; avoid “apricot” crushes that contain rough shards.
Pressure: light-to-medium—imagine holding a pencil, not digging a groove.
Duration: 30–60 seconds per zone; total face time ≈ 2–3 minutes.
Frequency: scrubs 1×/week (sensitive) to 2–3×/week (tolerant); konjac daily; dermaplane every 3–4 weeks.
Avoid: rubbing over broken skin, active acne, or inflamed rosacea.
Next we’ll look at powered devices and how they compare in precision and results.
3
Chemical Exfoliation at Home: AHAs, BHAs, Enzymes and Their Applicators
How chemical exfoliants work
Instead of abrasion, chemical exfoliants loosen the glue (desmosomes) between corneocytes or digest protein, allowing dead cells to shed more easily. Think of acids as molecular rollers and enzymes as tiny scissors—both speed up natural turnover without scrubbing. Penetration depends on molecule size, solubility, pH, concentration, and contact time.
Key actives and what to use them for
Alpha hydroxy acids (AHAs: glycolic, lactic): water‑soluble, brighten texture and pigmentation; glycolic is fast-acting (small molecule), lactic is gentler and hydrating.
Beta hydroxy acid (BHA: salicylic): oil‑soluble, penetrates pores to clear congestion and blackheads—great for oily, acne‑prone skin.
Polyhydroxy acids (PHAs: gluconolactone): larger, gentler acids for sensitive/dry skin with similar benefits plus humectancy.
Proteolytic/plant enzymes (papain, bromelain): surface digestion—very gentle, ideal for sensitive or reactive skin.
Best Seller
The Ordinary Glycolic Acid 7% Exfoliating Toner
Brightens and smooths uneven skin tone
A 7% glycolic acid toner that chemically exfoliates to help improve skin texture, brightness, and tone. Use as directed and pair with daily sunscreen, as exfoliation can increase sun sensitivity.
Cleansers/wash‑offs: short contact time → mild results; safe for regular use.
Toners/pads/leave‑ons: longer exposure → stronger and cumulative; pads often deliver uniform dose (e.g., single‑step peels).
Masks/peels: high concentration or occlusion increases potency; use for targeted sessions.Applicator matters: a soaked cotton pad spreads product broadly and can increase friction; a pump serum concentrates actives; masks trap heat and boost penetration. Choose format to match your experience level and desired result.
pH, concentration & practical rules
Lower pH typically increases AHA potency; OTC glycolic commonly 5–10%. Salicylic OTC is 0.5–2%. Start low, short contact, then increase frequency. Patch‑test new actives for 48 hours.
Safety & layering basics
Expect photosensitivity: daily SPF is mandatory.
Avoid stacking strong acids with retinoids or vitamin C without guidance.
If stinging or lasting redness occurs, stop and soothe with moisturizers and barrier repair. Begin simple—next we’ll compare how these gentle chemistries stack up against powered, mechanical devices for at‑home facials.
4
Electronic and Mechanical Devices: Brushes, Microdermabrasion, and Light Tools
How these powered options work
Electric devices add kinetic energy or focused energy to accelerate exfoliation: sonic or rotating brushes dislodge surface cells; microdermabrasion abrades with crystals or diamond tips to remove the stratum corneum; ultrasonic spatulas create cavitation that lifts debris; LED and ultrasonic adjuncts enhance circulation, inflammation control, and product absorption. Intensity is set by speed, tip/coarseness, and contact time.
Common devices and intensity levels
Sonic cleansing brushes (Foreo Luna 3, Philips VisaPure): gentle to moderate; great for daily resurfacing and makeup removal.
Motorized rotating/oscillating brushes: higher mechanical shear—use lower frequency on sensitive skin.
At‑home microdermabrasion (PMD Personal Microderm Classic, diamond‑tip devices): medium to high; best as monthly or biweekly treatments.
Ultrasonic spatulas: low‑to‑moderate; lift congestion and boost serums without abrasion.
LED masks (Dr. Dennis Gross SpectraLite FaceWare Pro): non‑abrasive; red light helps repair, blue targets bacteria.
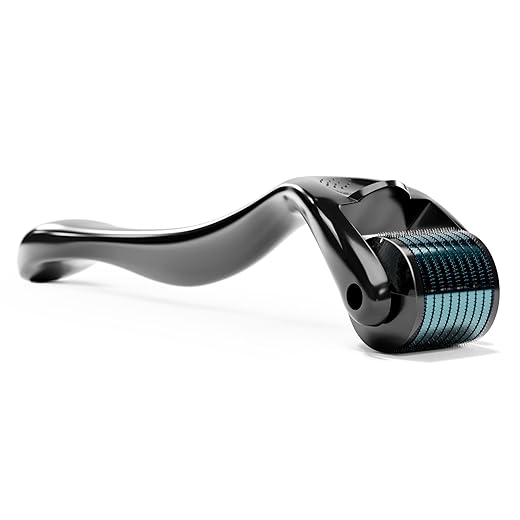
A 540-needle titanium derma roller with 0.25mm needles designed for gentle at-home use on face, beard, and scalp. Ergonomic and travel-friendly, it helps improve product absorption and supports smoother-looking skin.
Smoother texture and reduced rough patches (all skin types with tolerance).
Pore‑refining and reduced comedones with BHAs + mechanical adjuncts (oily/combination).
Improved product penetration after non‑abrasive delivery (ultrasonic + hydrating serums).
Avoid aggressive mechanical options if you have active rosacea, eczema, or a compromised barrier.
Safety, technique, and maintenance
Technique: short, even passes; avoid repeated passes in one spot; follow device timing. Brushes: 30–60 seconds; microdermabrasion: 1–3 minutes per zone; microneedling rollers: infrequently (1–4 weeks based on needle length).
Sanitation: clean heads after each use, deep‑sanitize weekly (isopropyl alcohol or brand instructions), replace brush heads per manufacturer. Never share tools that breach skin.
Contraindications: active cystic acne, open wounds, recent isotretinoin (wait 6–12 months), uncontrolled rosacea, or active infection—see a dermatologist first.
Practical integration tips
Layer devices thoughtfully: cleanse, gentle mechanical/sonic pass, targeted microdermabrasion or ultrasonic step (sparingly), finish with LED and a soothing serum + SPF. Start low, track skin response, and build toward salon‑like results without overdoing it.
Next, we’ll match these options to specific skin types and concerns so you can pick the best tool for your home‑facial needs.
5
Matchmaking: Choosing the Best Exfoliating Tool for Your Skin Type and Concerns
Quick decision matrix
Sensitive/Reactive: gentle enzymes, low‑strength AHAs (lactic/mandelic), or silicone/sonic devices on low. Avoid gritty scrubs and microdermabrasion.
Oily / Acne‑Prone: leave‑on salicylic acid (BHA) + gentle sonic brush or konjac sponge; consider cautious microdermabrasion only when acne is controlled.
Dry / Dehydrated: lactic acid or enzyme masks, ultrasonic spatula to boost serums; skip abrasive tools.
Aging / Texture / Fine Lines: glycolic acids, at‑home microdermabrasion (occasional), LED red light + retinoid layering.
Hyperpigmentation: targeted glycolic or mandelic regimes and consistent SPF; combine chemical exfoliation with professional treatments for deeper spots.
Recommendations by common concerns
Acne‑prone oily skin: Paula’s Choice 2% BHA serum for daily spot/zone treatment; use a soft sonic brush (Foreo Luna 3) at low intensity. Avoid harsh physical scrubs and home microneedling during flares.
Sensitive or rosacea‑prone skin: try mandelic or lactic acid <5% and enzyme masks (papaya/pumpkin styles) weekly; LED red light is safe and soothing. Avoid BHA if it stings repeatedly and skip microdermabrasion.
Texture and fine lines: bi‑weekly glycolic (8–10%) or monthly at‑home microdermabrasion (PMD Personal Microderm); follow with peptide/retinol program.
Hyperpigmentation: consistent low‑to‑moderate glycolic treatments, azelaic acid adjunct, and strict SPF. For stubborn spots, consult a pro for stronger peels or lasers.
Lifestyle, budget & maintenance
Low time/low fuss: leave‑on acids (BHA/AHA) and konjac sponge.
Invest once, low ongoing costs: Foreo Luna or ultrasonic spatula.
Spa‑level aims: budget for PMD or periodic professional microdermabrasion + maintenance serums.
Contraindications & red flags
Don’t use abrasive devices on open wounds, active cystic acne, recent isotretinoin use, or uncontrolled rosacea. See a dermatologist first.
Troubleshooting common problems
Redness after use: cool compress, barrier‑repair moisturizer (niacinamide/ceramides), skip treatments 1–2 weeks, reduce frequency or switch to gentler method.
Increased breakouts: differentiate purging (worse for 4–6 weeks then better) from irritation—if painful or persistent, stop mechanical tools, reduce acid strength, clean tools and pillowcases.
Next up: a practical, step‑by‑step home‑facial protocol and aftercare to use your chosen tool safely and get consistent glow.
6
How to Use Exfoliating Tools Safely at Home: A Step-by-Step Home-Facial Protocol and Aftercare
Prep: cleanse and patch-test
Start with a thorough double-cleanse if you wear makeup/sunscreen: oil-based cleanser, then gentle cream/gel cleanser. Always do a 24–48 hour patch test for new acids, enzymes, or devices on the jawline or behind the ear — look for delayed reactions.
Complete Kit
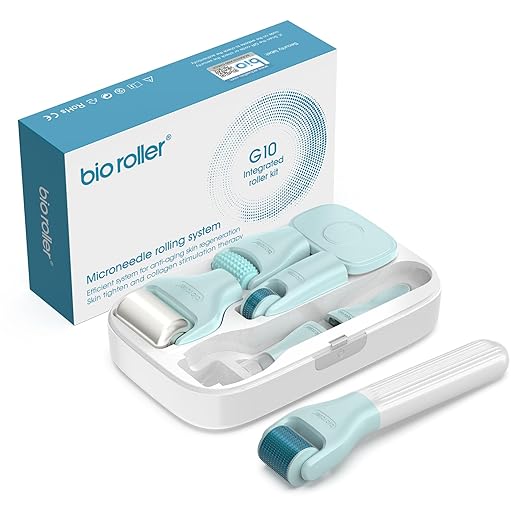
10-in-1 Derma Roller Kit with Replaceable Heads
Multiple heads for face, body, and scalp
A versatile derma roller kit including nine replaceable heads and a disinfection/storage case for hygienic home microneedling across face, body, beard, and scalp. Portable and beginner-friendly, it boosts skincare product absorption and convenience for travel use.
If you plan to use both modalities, avoid layering full-strength chemical peels and aggressive mechanical work in the same session.
Safer approach: mechanical (gentle brush/sonic) one evening, chemical leave‑on (AHA/BHA) the next day, or use very low concentrations together.
For leave‑on acids, follow product instructions for contact time; rinse only if specified.
Technique: pressure, motion, and duration
Mechanical brushes/konjac: glide with light pressure—think “letting the tool skim,” 20–30 seconds per zone (forehead, cheeks, nose, chin). Foreo Luna on low for sensitive skin.
Microdermabrasion: one controlled pass per area; don’t linger. PMD devices are best monthly for most skin.
Derma rollers: follow needle-length guidance; roll gently 4–6 times per zone only if skin is healthy.
Neutralize, rinse, and soothe
Rinse with lukewarm water unless product directs otherwise. Immediately follow with a hydrating serum (hyaluronic acid), then a barrier-repair moisturizer with ceramides or niacinamide. If daytime, finish with broad‑spectrum SPF 30+.
Frequency by skin type
Sensitive: enzymes or <5% AHA once weekly; sonic devices every 10–14 days.
Normal/combination: chemical 1–3×/week; gentle mechanical 1–2×/week.
Oily/acne‑prone: BHA up to every other day; sonic brush 2–3×/week.
Aggressive treatments (microdermabrasion/microneedling): monthly and only when skin is healthy.
Over‑exfoliation: signs and fixes
Redness, stinging, tightness, peeling, long‑lasting sensitivity. Stop active exfoliation, apply cool compresses, patch‑test a bland moisturizer (ceramides), short course of 1% hydrocortisone for severe inflammation, and see a clinician if blisters or infection appear.
Hygiene & device care
After each use rinse/clean with antibacterial soap or 70% isopropyl, air dry. Replace brush heads per manufacturer (≈3 months), sterilize derma-roller heads, and store devices dry in their case.
Next up: final tips to help you pick the right tool and maintain that glow.
Final Glow: Picking the Right Tool and Caring for Your Skin
Matching exfoliant type and intensity to your skin’s sensitivity, concerns, and routine is the cornerstone of safe, effective home facials. Begin slowly, patch-test new products and devices, and increase frequency only when skin tolerates it. Remember gentler methods often win for long-term health.
Consistent, careful exfoliation combined with moisturizing, sun protection, and professional check-ins yields the best results: brighter tone, smoother texture, and fewer breakouts. Choose tools thoughtfully, listen to your skin, and treat aftercare as essential—your glow depends on it. Start wisely and enjoy a healthier radiant complexion.
Hey, I’m Ava Wilson—a skincare enthusiast and a certified esthetician. I’m dedicated to sharing my knowledge and empowering others to achieve healthy, glowing skin through simple, effective routines and natural remedies. Join me on this exciting skincare journey, and let’s unlock your skin’s potential for a confident, beautiful you.
Short and simple — how often can I use the DRMTLGY microdermabrasion exfoliating facial scrub mask if I’m also using The Ordinary Glycolic toner? I tend to be lazy with aftercare so scared of overdoing it 😅
Short answer: space them out. If you use the glycolic toner 1–2x/week, limit the microdermabrasion mask to once weekly or every other week depending on how your skin reacts. Always follow with a calming moisturizer and daily SPF. Patch test new combos and reduce frequency if you notice irritation.
So I bought the ROSELYNBOUTIQUE 540 Titanium microneedle derma roller because… curiosity got the better of me. Looks kinda medieval ngl 😂
I haven’t used the 540 on my face yet (heard that’s for pros), but the 10-in-1 kit with replaceable heads seems more approachable for at-home. Anyone else feel like they’re one brave YouTube tutorial away from becoming their own esthetician? lol
Ha — I felt the same. Quick caution: 540 needles are long and can be aggressive; many pros advise against deep at-home microneedling. If you’re trying at home, stick to 0.25–0.5mm heads and be super strict about sterilization. Otherwise, consider seeing a pro for deeper treatments.
Good point, Jake. The article highlights sterilization, needle length, and when to see a professional. For beginners, shorter needles in a multi-head kit are a safer place to start. And if you try any roller at home, follow the cleaning protocol and avoid rolling over active acne or open skin.
Quick question — I use The Ordinary Glycolic Acid 7% exfoliating toner twice a week and was eyeing the DRMTLGY Microdermabrasion mask for weekends. Is it okay to layer chemical + mechanical exfoliation in the same week? How many days apart should they be?
Also curious about adding the COSLUS silicone brush into the mix — would that be overkill? I have combo skin with occasional dryness around the cheeks.
Yes — enzymes (like papain/bromelain) are typically milder and can be a good middle ground between chemical and mechanical exfoliation. They’re often suitable for sensitive or post-treatment days. Still, keep sunscreen and calming products as part of your aftercare.
I alternate: Glycolic on Tues + Fri nights, and the microdermabrasion on Sunday mornings. My skin handled that well, but started slowing down to microdermabrasion every other week when I noticed slight redness. Tweak to your comfort level!
Good question, Maya. In general it’s safer to avoid doing a strong AHA (like glycolic 7%) on the same day as an intense mechanical exfoliant (microdermabrasion). A practical schedule: glycolic 1–2x/week, microdermabrasion mask 1x/week on a different day (or every other week if your skin is sensitive). The COSLUS silicone brush is gentler — you can use it more often (e.g., 2–3x/week) for cleansing without the same risk. Always patch test and adjust based on how your skin responds.
Tried the Schick Hydro Silk Touch-Up dermaplaning razors after reading this — omg, the peach-fuzz + dead skin combo just vanished. Skin felt ridiculously smooth.
A few notes from a newbie: go slow, short strokes, and make sure your skin is CLEAN and dry. I made the mistake of rushing the first time and got a tiny nick (rookie error 😬).
Love that the article has a step-by-step home-facial protocol — that saved me. Also, pair it with a gentle moisturizer and SPF the next day.
If you have active acne, tho, maybe skip the razor around inflamed spots. YMMV!
Thanks for sharing, Liam — great tips. Quick safety reminder from the protocol: always use light, upward strokes and replace blades often. After dermaplaning, avoid strong chemical exfoliants (like high‑strength AHAs/BHAs) for at least 48–72 hours and use a calming moisturizer + broad‑spectrum SPF during the day.
Heads up for acne-prone ppl: I had little breakouts after using a razor in the same session as an exfoliating scrub. Now I either do razors OR scrubs, not both. 🙂
Nice review! I do a gentle dermaplane once every 2–3 weeks and it’s my easiest no-makeup hack. Totally agree on the SPF — your skin is so tender after.
I swapped my old sonic brush for the COSLUS 2-in-1 Silicone Electric Facial Cleansing Brush and honestly there’s a noticeable difference in breakouts — fewer clogged pores and less redness from scrubbing.
Couple of things I liked from the article: the Matchmaking section helped me pick the silicone brush over bristles because I have sensitive/combo skin. The How-to-use protocol is golden — I do a gentle facial oil melt before using the brush on low speed, then a mild AHA a couple nights later.
Cleaning tip: silicone brushes are WAY easier to sanitize than bristle heads (soap + air dry), but still replace if the motor starts to smell or the silicone tears.
Also, is anyone else using LED/light tools after exfoliating? Wondering about timing and whether it’s too many gadgets 😂
Thanks for the detailed share, Sofia — super helpful. To your LED question: many people pair LED therapy after exfoliation because clean, exfoliated skin can improve light penetration. Just make sure your exfoliation wasn’t irritating (no broken skin) and use LED sessions according to the device’s instructions. And yes, silicone brushes are easier to keep hygienic; follow the cleaning + replacement guidance in the Final Glow and device care sections.
I switched to silicone last year and my skin calmed way down. Also agree: LED after a gentle exfoliation is a lovely combo. Feels like a spa, not a science experiment 😆
A sensible approach: use a silicone cleansing brush 3–5x/week depending on sensitivity. It’s generally fine for daily gentle cleansing if you keep intensity low, but avoid aggressive scrubbing every day. Listen to your skin — if you see redness or tightness, scale back.


Short and simple — how often can I use the DRMTLGY microdermabrasion exfoliating facial scrub mask if I’m also using The Ordinary Glycolic toner? I tend to be lazy with aftercare so scared of overdoing it 😅
Also — moisturize well and do a small patch test first. I learned the hard way (peeling face is not a good look).
Short answer: space them out. If you use the glycolic toner 1–2x/week, limit the microdermabrasion mask to once weekly or every other week depending on how your skin reacts. Always follow with a calming moisturizer and daily SPF. Patch test new combos and reduce frequency if you notice irritation.
So I bought the ROSELYNBOUTIQUE 540 Titanium microneedle derma roller because… curiosity got the better of me. Looks kinda medieval ngl 😂
I haven’t used the 540 on my face yet (heard that’s for pros), but the 10-in-1 kit with replaceable heads seems more approachable for at-home. Anyone else feel like they’re one brave YouTube tutorial away from becoming their own esthetician? lol
Ha — I felt the same. Quick caution: 540 needles are long and can be aggressive; many pros advise against deep at-home microneedling. If you’re trying at home, stick to 0.25–0.5mm heads and be super strict about sterilization. Otherwise, consider seeing a pro for deeper treatments.
Good point, Jake. The article highlights sterilization, needle length, and when to see a professional. For beginners, shorter needles in a multi-head kit are a safer place to start. And if you try any roller at home, follow the cleaning protocol and avoid rolling over active acne or open skin.
Quick question — I use The Ordinary Glycolic Acid 7% exfoliating toner twice a week and was eyeing the DRMTLGY Microdermabrasion mask for weekends. Is it okay to layer chemical + mechanical exfoliation in the same week? How many days apart should they be?
Also curious about adding the COSLUS silicone brush into the mix — would that be overkill? I have combo skin with occasional dryness around the cheeks.
Yes — enzymes (like papain/bromelain) are typically milder and can be a good middle ground between chemical and mechanical exfoliation. They’re often suitable for sensitive or post-treatment days. Still, keep sunscreen and calming products as part of your aftercare.
I alternate: Glycolic on Tues + Fri nights, and the microdermabrasion on Sunday mornings. My skin handled that well, but started slowing down to microdermabrasion every other week when I noticed slight redness. Tweak to your comfort level!
Good question, Maya. In general it’s safer to avoid doing a strong AHA (like glycolic 7%) on the same day as an intense mechanical exfoliant (microdermabrasion). A practical schedule: glycolic 1–2x/week, microdermabrasion mask 1x/week on a different day (or every other week if your skin is sensitive). The COSLUS silicone brush is gentler — you can use it more often (e.g., 2–3x/week) for cleansing without the same risk. Always patch test and adjust based on how your skin responds.
Would an enzyme exfoliant be kinder between those days? I feel like enzymes are less harsh but still effective.
Tried the Schick Hydro Silk Touch-Up dermaplaning razors after reading this — omg, the peach-fuzz + dead skin combo just vanished. Skin felt ridiculously smooth.
A few notes from a newbie: go slow, short strokes, and make sure your skin is CLEAN and dry. I made the mistake of rushing the first time and got a tiny nick (rookie error 😬).
Love that the article has a step-by-step home-facial protocol — that saved me. Also, pair it with a gentle moisturizer and SPF the next day.
If you have active acne, tho, maybe skip the razor around inflamed spots. YMMV!
Thanks for sharing, Liam — great tips. Quick safety reminder from the protocol: always use light, upward strokes and replace blades often. After dermaplaning, avoid strong chemical exfoliants (like high‑strength AHAs/BHAs) for at least 48–72 hours and use a calming moisturizer + broad‑spectrum SPF during the day.
Heads up for acne-prone ppl: I had little breakouts after using a razor in the same session as an exfoliating scrub. Now I either do razors OR scrubs, not both. 🙂
Nice review! I do a gentle dermaplane once every 2–3 weeks and it’s my easiest no-makeup hack. Totally agree on the SPF — your skin is so tender after.
I swapped my old sonic brush for the COSLUS 2-in-1 Silicone Electric Facial Cleansing Brush and honestly there’s a noticeable difference in breakouts — fewer clogged pores and less redness from scrubbing.
Couple of things I liked from the article: the Matchmaking section helped me pick the silicone brush over bristles because I have sensitive/combo skin. The How-to-use protocol is golden — I do a gentle facial oil melt before using the brush on low speed, then a mild AHA a couple nights later.
Cleaning tip: silicone brushes are WAY easier to sanitize than bristle heads (soap + air dry), but still replace if the motor starts to smell or the silicone tears.
Also, is anyone else using LED/light tools after exfoliating? Wondering about timing and whether it’s too many gadgets 😂
For anyone using LED: don’t forget sunscreen after exfoliation + LED. Did a harsh peel once and skipped SPF — big regret.
Thanks for the detailed share, Sofia — super helpful. To your LED question: many people pair LED therapy after exfoliation because clean, exfoliated skin can improve light penetration. Just make sure your exfoliation wasn’t irritating (no broken skin) and use LED sessions according to the device’s instructions. And yes, silicone brushes are easier to keep hygienic; follow the cleaning + replacement guidance in the Final Glow and device care sections.
I switched to silicone last year and my skin calmed way down. Also agree: LED after a gentle exfoliation is a lovely combo. Feels like a spa, not a science experiment 😆
A sensible approach: use a silicone cleansing brush 3–5x/week depending on sensitivity. It’s generally fine for daily gentle cleansing if you keep intensity low, but avoid aggressive scrubbing every day. Listen to your skin — if you see redness or tightness, scale back.
How often do you run the COSLUS brush? Daily? Every other day? I worry about over-exfoliating even with silicone.