How to Use a Sculpting Face Roller for Maximum Results
Are you ready to take your skincare routine to the next level? Look no further than the sculpting face roller! This step-by-step guide will show you exactly how to use this incredible tool for maximum results. We understand that achieving beautiful, radiant skin is important to you, and that’s why we’ve created this guide with empathy in mind. So get ready to roll your way to a more youthful and sculpted face!
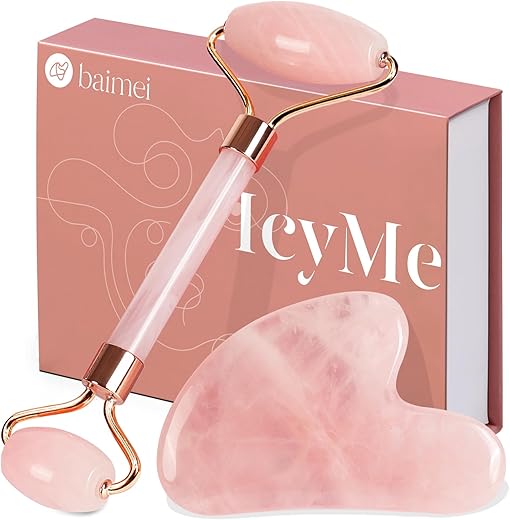
Top-rated roller for sculpted facial contours


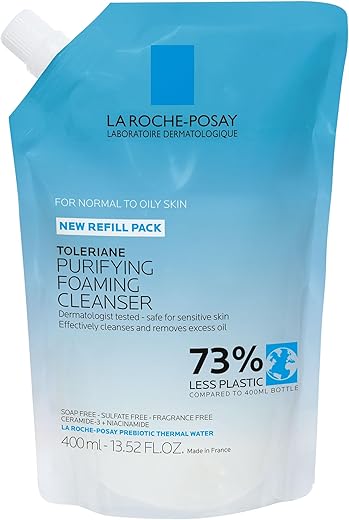
Step 1: Cleanse your face
Wash your face using a gentle cleanser, massaging it onto your skin in circular motions. Rinse thoroughly with lukewarm water and pat your face dry using a clean towel.


Step 2: Apply a facial oil or serum
- Clean your face using your preferred cleanser and pat it dry with a towel.
- Choose your favorite facial oil or serum, such as rosehip oil or hyaluronic acid serum.
- Dispense a few drops of the oil or serum onto your fingertips.
- Gently massage the oil or serum onto your face, focusing on areas where you want to see improvements, like fine lines or dry patches.
- Ensure that the oil or serum is evenly distributed on your face, covering all areas.
- Wait for a few minutes to let the oil or serum absorb into your skin before moving on to the next step.
- Examples of facial oils or serums:
- Rosehip oil: Rich in antioxidants and essential fatty acids, it helps to rejuvenate and hydrate the skin.
- Hyaluronic acid serum: It deeply moisturizes the skin and helps to plump up fine lines and wrinkles.
- Argan oil: Known for its nourishing properties, it can improve skin elasticity and reduce inflammation.
- Vitamin C serum: It brightens the skin tone, reduces hyperpigmentation, and promotes collagen production.
- Retinol serum: Ideal for reducing the appearance of wrinkles and promoting cell turnover.
- Note: Make sure to choose an oil or serum that suits your skin type and concerns. If you have sensitive skin, it’s recommended to patch test the product before applying it to your entire face.
Step 3: Start rolling from the center of your face
To start rolling from the center of your face, begin by placing the face roller in the middle of your forehead. Apply gentle pressure and roll the roller outwards towards your temples. Repeat this motion 3-4 times, ensuring a smooth and even movement. For example, imagine you are drawing an imaginary line from the center of your forehead to your temples using the face roller. Keep the pressure light and comfortable throughout the process.


Step 4: Move to the cheeks and jawline
Next, position the roller on your cheeks and jawline. Roll the roller in an outward motion, starting from the center of your face towards your ears. Apply gentle pressure as you repeat this action 3-4 times on each side. For example, begin at the center of your chin and roll the roller along your jawline towards your ear. Repeat this on the other side.
Step 5: Focus on the under-eye area
- Gently roll the face roller under your eyes, starting from the inner corner and moving towards the outer corner.
- Use light pressure in this delicate area to avoid any discomfort or irritation.
- Repeat this rolling motion 3-4 times, ensuring that the roller glides smoothly across your under-eye area.
- Take your time and be mindful of the gentle pressure applied, as this will help promote circulation and reduce puffiness.
Remember, the under-eye area is sensitive, so treat it with care. The rolling motion will help improve blood flow and reduce the appearance of dark circles and under-eye bags.

Step 6: Roll along the jawline and neck
Continue rolling the face roller along your jawline and neck, moving downwards towards your collarbone. Apply gentle pressure and use upward strokes to encourage lymphatic drainage and reduce puffiness. Repeat this motion 3-4 times for optimal results.
Step 7: Clean and store your face roller
To clean your face roller after each use, gently wash it with mild soap and water. Ensure that all the product residue is removed and then pat it dry with a clean towel. Store your face roller in a dry place to maintain its hygiene and prevent any buildup of bacteria.
Step 8: Repeat regularly for maximum results
Step 8: Incorporate face rolling into your skincare routine 2-3 times a week.
Instructions:
- Prepare your face roller: Clean your face roller with mild soap and water before each use to ensure hygiene.
- Choose the right time: Find a time in your skincare routine where you can dedicate a few extra minutes to face rolling. This could be after cleansing and before applying moisturizer.
- Apply skincare products: Before using the face roller, apply your usual skincare products such as serums or moisturizers. These will provide a smooth surface for the roller to glide on.
- Begin rolling: Starting from the center of your face, gently roll the face roller outwards in an upward motion. Use light pressure and avoid dragging or pulling on your skin.
- Follow a pattern: Move the face roller in vertical, horizontal, and diagonal motions, covering your forehead, cheeks, chin, and neck. The pattern you follow should be comfortable for you and cover all areas of your face.
- Repeat the process: Roll each area of your face 5-10 times, ensuring even coverage and stimulation of your facial muscles.
- Pay attention to sensitive areas: Be extra gentle around delicate areas such as the under-eye area or any areas with skin conditions.
- Clean and store your face roller: After each use, clean your face roller with mild soap and water again, pat it dry, and store it in a clean and dry place.
- Repeat regularly: To see maximum results, incorporate face rolling into your skincare routine 2-3 times a week. Consistency is key in reaping the benefits of using a sculpting face roller.
By following these instructions and incorporating face rolling into your skincare routine regularly, you can enjoy the potential benefits of improved blood circulation, reduced puffiness, and a refreshed appearance.
Achieve your skincare goals
To sum up, incorporating a sculpting face roller into your skincare routine can yield impressive results. By following the steps outlined in this blog post and using it consistently, you can maximize its potential and reap the benefits it provides for your skin.
Necessary Supplies


Expert Techniques
Step-by-Step Guide to Your Daily Jade Roller Routine
Step-by-step guide for using the Sculpting Face Roller
- Start with clean and moisturized skin: Before using the sculpting face roller, ensure that your face is clean and apply a hydrating moisturizer to create a smooth surface for the roller to glide on
- Apply gentle pressure: Hold the sculpting face roller with a light grip, and begin rolling it gently upwards and outwards on your face. Apply just enough pressure to feel a slight resistance, but avoid pressing too hard to prevent discomfort or skin damage
- Use upward strokes: Roll the face roller in upward motions, starting from the center of your face (chin, jawline, and cheeks) and moving towards the hairline. This upward motion helps stimulate blood circulation and lymphatic drainage, giving your skin a lifted and rejuvenated appearance
- Focus on target areas: Pay extra attention to specific areas of concern, such as the under-eye area, forehead, or jawline. Spend more time rolling on these target areas to effectively massage and sculpt the skin
- Incorporate with skincare products: For enhanced results, you can use the sculpting face roller while applying your favorite serums or facial oils. This will help the products penetrate deeper into the skin, maximizing their benefits while enjoying the soothing effects of the roller
- Note: It’s always advisable to read the instructions provided by the manufacturer of the specific sculpting face roller you are using, as different products may have slightly different usage guidelines
Frequently Asked Questions about Sculpting Face Rollers
What is a sculpting face roller?
A sculpting face roller is a beauty tool used for facial massage and skincare. It typically consists of a handle attached to a roller made of jade, rose quartz, or other materials. The roller has one or two smooth, rounded ends that are gently rolled over the face and neck. This tool helps promote blood circulation, reduce puffiness, and stimulate lymphatic drainage. It can also aid in relaxing facial muscles, toning the skin, and enhancing the absorption of skincare products. Regular use of a sculpting face roller is believed to improve the overall appearance and health of the skin.
Are there any recommended techniques for using a sculpting face roller?
Yes, there are some recommended techniques for using a sculpting face roller. Here are a few:
- Cleanse your face: Before using a face roller, make sure your face is clean and free from any makeup or impurities. This will ensure better contact with the roller and prevent any potential irritation.
- Apply a facial oil or serum: To enhance the gliding motion of the roller and provide hydration to your skin, apply a few drops of your favorite facial oil or serum. This will also help the roller to move smoothly across your face.
- Start from the center: Begin at the center of your face, such as your forehead or chin, and roll outward towards the hairline or jawline. This helps to promote lymphatic drainage and reduce puffiness.
- Use gentle pressure: While rolling, apply gentle pressure on your skin. Avoid pressing too hard, as it may cause discomfort or skin irritation.
- Repeat each stroke: Repeat each rolling stroke 3-5 times before moving to the next area. This ensures that the product is evenly distributed and fully absorbed into the skin.
- Target specific areas: Pay special attention to areas that may need extra care, such as under the eyes or along the jawline. You can use the smaller end of the roller for more precision in these areas.
- Use upward motions: When rolling, try to use upward motions rather than downward. This helps to counteract the effects of gravity and promote a lifting effect on the skin.
- Clean your roller: After each use, clean your face roller with mild soap and warm water. This ensures its longevity and prevents the buildup of bacteria.

Hey, I’m Ava Wilson—a skincare enthusiast and a certified esthetician. I’m dedicated to sharing my knowledge and empowering others to achieve healthy, glowing skin through simple, effective routines and natural remedies. Join me on this exciting skincare journey, and let’s unlock your skin’s potential for a confident, beautiful you.


