
Why Brows Matter: Framing Your Face Naturally
Brows shape expressions and set facial balance. A well-groomed, natural brow can lift the eyes, define cheekbones, and make your whole face look more put together without heavy makeup. This guide focuses on simple, fast techniques to enhance what you already have so your features read as framed and polished.
You’ll find quick assessments to discover your natural shape, essential tools, fast shaping steps to tame and trim, and easy fill and tint hacks for believable fullness. Also included: low-effort maintenance and styling tips tailored to different face shapes. Read on for practical, time-saving brow strategies that deliver a naturally framed look. They work for all skill levels and busy schedules everyday use.

Unbelievable Eyebrow Hack That Actually Works
Know Your Natural Brow: Anatomy and Face-Framing Principles
Brow Anatomy: the parts that matter
Understanding the four basic parts makes shaping quick and confident.
Each section plays a role: a fuller head softens harsh features, a higher arch lifts, and a longer tail narrows a round face.
How brows interact with your features (practical rules)
Think of brows as miniature architecture for the face. Small moves—1–2 mm—can change perception dramatically: raising the arch a touch lifts the eye; shortening the tail can soften a strong jawline.
Fast visual rules of thumb to use with a pencil:
Quick, actionable tip: hold a clean pencil from nostril to inner eye and mark start/arch/end before any plucking. For tools, a spoolie (Anastasia dual-ended or Sephora Pro) plus a thin angled brush or micro-fine pencil (e.g., Benefit Precisely, My Brow Pencil) gives natural control without overfilling.
Use these simple measurements as your map—then tweak subtly to lift, soften, or balance based on your face’s unique planes.
Quick Assessment: Find Your Natural Shape in Minutes
Tools at hand
You only need a clean pencil (or straight edge), a spoolie, and good light. If you like precision, a small ruler or measuring tape helps—but the pencil trick is faster for most mornings.
90‑second mapping method
- Hold a pencil vertically at the nostril to mark the brow start.
- Angle it from nostril through the pupil to mark the highest point.
- Angle it from nostril to outer eye corner to mark the tail.Step back, brush brows up with a spoolie, and note where hair naturally falls outside those marks—that’s where grooming will be most visible.
Read growth pattern & density
Spot asymmetry vs. structure
Check symmetry by comparing start points and arch heights; small differences are normal. If one brow’s bone sits higher, aim for visual balance—don’t force mirror symmetry.
Quick decision checklist (choose one)
For different textures and sparse zones, pick the fastest route above—next, we’ll cover the exact tools and products to execute these choices.
Essential Tools and Products for Fast, Natural Results
The minimal toolkit (what to carry)
A pared-down kit lets you get great brows in under five minutes. Aim for these essentials:
Choose the right shades (avoid the heavy-line look)
Match product tone to hair and skin to keep strokes soft:
Quick product hacks
Sanitize & go
Wipe blades and tools with 70% isopropyl; keep a capped spoolie and small zip pouch for portability. A travel-size tweezers/scissors set and a mini gel make touch-ups easy between appointments.
Next up: fast shaping techniques to tame, trim, and define those brows quickly.
Fast Shaping Techniques: Tame, Trim, and Define
Quick safety rules
Always work with good light, a magnifying mirror if needed, and freshly washed skin. Tweeze after a warm shower (pores open) and stop if your skin reddens or hurts — slower is safer.

How to tweeze stray hairs (under 5 minutes)
Tip: Tweeze only the hairs below the arch and stray upper lid hairs — avoid the dense head of the brow.
Trim long hairs without losing shape
Create tidy edges without overplucking
When to seek a pro
Book waxing/threading if you want a new shape, have very thick/coarse hair, sensitive skin, or recurrent irritation. Professionals are best for major reshapes and long-term symmetry.
Micro-routine (10–15 min)
Emergency fixes
Fill and Tint Hacks for Natural-Looking Fullness
Mimic hairs with micro-strokes
Short, hair-like pencil strokes in sparse zones beat blocky filling every time. Start at the tail and work inward, then feather the front with very light, upward flicks so the head reads soft, not painted. Finish by brushing through with a spoolie to break up any harsh marks.

Powders, pomades and layering for texture
Tinting options that cheat fullness
Color-match and quick rules
Wake-up-and-go 60-second routine
Low-Effort Maintenance: Keep Brows Framed Between Appointments
Weekly 5-minute shape-up
A short, consistent weekly session prevents the “one bad day” where you need a major reshaping. Try this 5-minute routine on the same day each week:
Nightly brush-and-condition ritual
Every night, spend 20–30 seconds brushing brows upward with a clean spoolie to train direction and distribute skin oils. Then apply a lightweight conditioning swipe—castor oil is potently economical, argan oil is less viscous, and peptide serums like The Ordinary Multi-Peptide Lash and Brow Serum target growth pathways without greasiness. Use a drop on the spoolie, not your fingers, to avoid applying too much.
Morning 60-second touch-ups
For busy mornings:
Preventative micro-habits
Small, regular steps like these keep your brows framed and natural-looking—next, we’ll explore styling tricks that pair that clean base with different face shapes.
Styling Tricks to Complement Different Face Shapes
Oval — keep it natural and balanced
Oval faces suit most brow styles. Keep a soft, moderate arch and maintain natural thickness.
Round — add length and a gentle peak
Lengthen the tail slightly and raise the arch subtly to create vertical lift and elongate the face.
Square — soften strong angles
Soften a high, harsh arch by lowering peak intensity and rounding the inner brow to reduce boxiness.
Heart — balance forehead with a softer lower arch
Soften the top of the arch and keep the tail proportionate to avoid overwhelming a narrow chin.
Long (Rectangular) — shorten and flatten slightly
Avoid overly high arches. Keep the arch lower and slightly shorten the tail to prevent elongating the face.
Quick finishing touches
These tweaks let the same fast hacks flatter different faces — next, we’ll wrap up with simple steps that deliver big impact.
Simple Steps, Big Impact
A few focused techniques—quickly assessing your natural shape, minimal shaping, smart filling, and tiny maintenance habits—can transform brows and naturally frame your face. Consistency matters more than perfection; short, repeatable steps build durable, flattering results that suit your unique features and daily rhythm.
Adopt a simple routine tailored to your face—practice it for a week and notice the lift. Try one tweak today and let small changes deliver effortless polish every day. Small steps, practiced daily, make a noticeable difference.

Hey, I’m Ava Wilson—a skincare enthusiast and a certified esthetician. I’m dedicated to sharing my knowledge and empowering others to achieve healthy, glowing skin through simple, effective routines and natural remedies. Join me on this exciting skincare journey, and let’s unlock your skin’s potential for a confident, beautiful you.


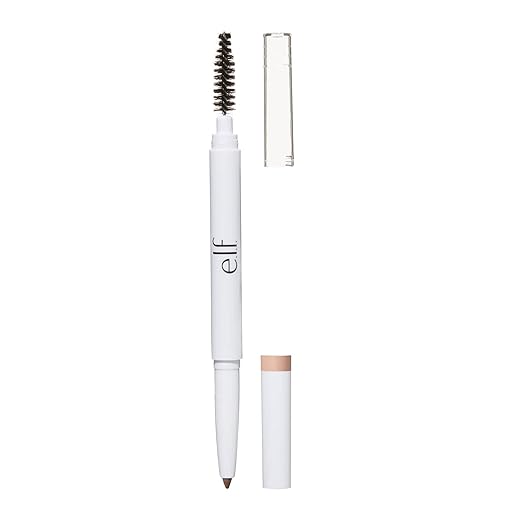
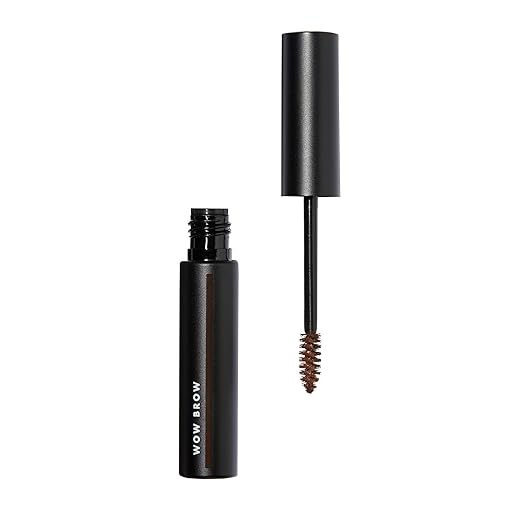
Huge fan of the Fill and Tint hacks section — especially for hooded eyes like mine. The Wow Brow Volumizing Wax-Gel for Brunette paired with the Dual-Ended Instant Lift Brow Pencil Neutral Brown gives me a fluffy but still-natural look that lasts way past my commute.
I also appreciate the low-effort maintenance tips. I do a 2-minute nightly brush + tiny clear gel routine and wake up with brows that don’t need much work.
Thank you for the product recs and the simple steps — saved me from overplucking for good!
So glad that routine is working for you, Lena — the nightly brush + gel is underrated. If you ever want a slightly bolder look, try a touch of the volumizing wax then lightly comb through with the spoolie.
That combo sounds perfect. Trying it this week — fingers crossed my sparse tails behave 😬
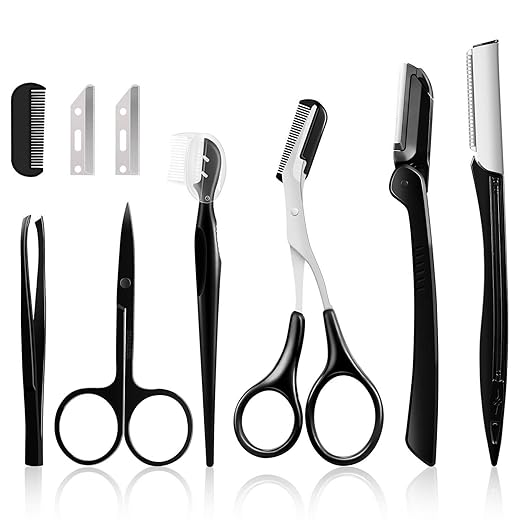
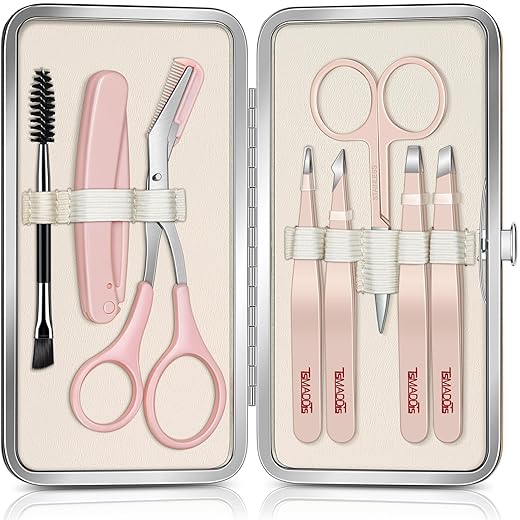
Quick question: the article lists both a 9-in-1 Multipurpose Eyebrow Grooming Dermaplaning Kit and a 6-Piece Precision Tweezers Set with Leather Case. If I had to pick one starter tool right now (no budget worries), which is more versatile for someone aiming for natural, low-effort brows every day?
If you like clean skin surface and occasional peach fuzz removal, get the dermaplaning kit. If you’re all about shape, go tweezers.
If you’re starting fresh and want versatility, the 9-in-1 kit covers dermaplaning plus a few grooming tools — good for smoothing and quick fixes. But if your main goal is shaping and removing individual hairs, the precision tweezers set is a long-term staple. For daily natural looks, many prefer starting with precise tweezing + a good pencil or wax-gel.
I chose tweezers first and haven’t regretted it. Dermaplaning felt extra — nice but not essential.
Good overview. I liked the Quick Assessment part — found my natural shape in like 4 minutes. I bought the 8-in-1 Precision Tweezers and Grooming Kit after reading this; quality is decent for the price. However, the dermaplaning kit sounds a bit scary for a newbie — any safety tips? I nearly gave up the idea.
Dermaplaning isn’t scary if you treat it like shaving. But pls don’t try cutting long hairs with it — tweezers first. 😉
Thanks everyone, that’s helpful. I’ll take it slow and skip it on days I have big events!
I used the 9-in-1 kit a few times — go slowly and don’t rush. Also, never use it over active acne or irritated skin.
Great to hear the assessment helped, Ethan. For dermaplaning: always work on clean, dry skin, hold the skin taut, and use short strokes at a shallow angle. Start light — no pressure. If you’re unsure, test on a small area first or see a pro.
I like the tint hacks but PLEASE be careful with tinting at home. I used a kit once and did not read all the warnings (rookie move) — ended up with one brow darker than the other for a week. 😂
Also — does anyone else find the Brow Glue flakes a bit after a while? Maybe I’m using too much. 😬
ps: love the simple steps section. Minimalist routines for the win!
I had flaking too once. Switched to a different clear gel and it’s much better. Sometimes it’s the formula, not you!
Good callout, Nora — patch tests and careful timing are key for at-home tinting. For glue flaking: try a lighter layer and make sure the gel is fully tacky before brushing hair into place; some formulas can flake if over-applied.
Okay full disclosure: I tried the Fast Shaping Techniques and accidentally trimmed my left brow too short. 😂 Fashion statement? Not really.
Question for anyone who’s repaired a trim-gone-wrong: does tinted pencil or the 6-Piece Precision Tweezers Set with Leather Case help more while waiting for regrowth? Also — why do all brow tutorials assume you have a steady hand??
Thanks y’all — gonna attempt pencil camouflage tonight. If it looks like clown brows, blame gravity.
Oof, been there. For a quick fix, use a creamy, short-stroke pencil (Dual-Ended Precision Instant Lift Brow Pencil works well) to recreate hair strokes where missing, then set with a clear gel. Tweezers are great for shaping once hairs grow back, but the pencil will camouflage short spots immediately.
Pencil > tweezer for ’emergency cover’ — tweezers will just make the problem worse right now. Use light, short strokes and blend with a spoolie.
Also try a tiny dab of wow brow wax to add texture after penciling — makes it look more hair-like.
Haha steady hands are overrated. I rest my elbow on the sink and pretend I’m doing microblading 😂
Love the simple hacks here — super doable on a rushed morning. Tried the Dual-Ended Precision Instant Lift Brow Pencil + spoolie and it actually makes a quick, natural flick without looking painted on. Also the Brow Glue Extreme Hold is a game-changer for my stubborn hairs.
Only gripe: took a minute to find a good brow angle for my round face, the styling tricks helped though. 😅
Yep, the glue saved me at my wedding — no stray hairs all night. Pro tip: use a tiny bit so it doesn’t flake later.
Which instant lift pencil did you use — neutral or the one marked ‘neutral brown’? They have two and I get confused lol
So glad that combo worked for you, Maya! For round faces, the section on creating a slightly higher arch can add subtle length — try using the spoolie to brush hairs upward before filling.